Showing posts with label Blender. Show all posts

Thursday, August 19, 2021

Hieroglyph Magic

The last Intro to Hieroglyphs Class was the other week, and I've been spending some time writing various words in hieroglyphs, making flashcards, and going through Sir Alan Gardiner's "Egyptian Grammar, edition three."  "Egyptian Grammar," is interesting and informative (and funny in some places), but I did have a moment about two days into it where I had to admit to myself that I had secretly hoped it would be filled with Ancient Egyptian Spells (cue DeForest Kelley as Dr. McCoy asking High Priestess Natira of Yonada about The Book of The People concealed within an obelisk, "Don't you long to know its secrets?").  

While I have found a section to a "spoken offering" frequently carved in mortuary temples, so far there hasn't been a Middle Kingdom version of "Oh Zephyr Winds / which blow on high: / Lift me now / so I can fly!"  

What is intriguing about hieroglyphs to me is that their use of unvoiced determinatives, which are frequently ideograms, at the end of words. Written English doesn't use them, but the closest thing I can think of that would be like them was if we wrote the word "stop" and then added a red octagon at the end. Or, I suppose, the word "poop" and then added the poop emoji (eye roll).   Ideograms and determinatives give Egyptian hieroglyphs an appealing graphic design element.

One word I thought I would like to try out is "ḥekꜣ," or, to give it's English translation, "magic."  It's spelled wick, ka, vulture, man pointing to his mouth.  The wick is a twist of flax used in oil lamps.  The ka is a soul or spirit.  The vulture is a vulture.  The determinative of the man pointing to his mouth ends words related to voice, eating, or the mouth.   


I went to the Unicode web site, found the hieroglyphs, arranged them in InkScape, then imported the InkScape SVG into Blender.  After a while fiddling with Blender meshes -- I need to re-import the SVG and close up holes in the individual meshes -- I had some objects I could render.  Unfortunately, importing the unicode characters, especially complex characters with lots of loops and holes, results in confused meshes that aren't manifold (or "air-tight"); so I couldn't use what I'd created to engrave hieroglyphs from a solid block using a Boolean difference function.  Oh, well; only embossed figures for me.  

I'm ambigious about the result.  On one hand, it's cool to see the Ancient Egyptian word for "magic" glowing on a computer screen.  On the other hand, there's room for improvement.  The unicode characters are great for sending Tweets, IM, or e-mail messages; but they don't scale up well.  The way the characters are constructed doesn't give me much room to play with stroke weight, so some hieroglyphs look chunky.  Granted, this is a typeface and not graphic art, but because they're designed for an 8 or 12 point, there's no option for fine details like fingers or eyes, and so things look utilitarian and over-simplified.  I'm thinking that I might improve this render if I'm able to bevel the hieroglyphs so they don't look quite so blocky.  Finally, these simply might look better engraved instead of embossed. 

Perhaps I can use photos of the Sarcophagus of Harkhebit for more finely crafted examples 


Saturday, December 26, 2020

Post Holiday Rendering


I took the quiet time today to work on a medieval style armillary sphere in Blender.  In an earlier version, I had difficulties punching the glyph for Gemini out of the band because Blender got a little confused by the negative space and couldn't perform a boolean difference, and instead performed a boolean addition.  

Today's agenda includes cleaning, resting, dusting, laundry, crafting some thank you notes (which I really should send out instead of looking at a stack of completed notes needing postage) and waiting for the books I ordered three weeks ago to arrive.

Saturday, July 25, 2015

More Ankh Goodness

 The ankh saga continues...  since I had an SVG file created by Inkscape (see yesterday's post), that meant I could import it into Blender, turn the vectors into a manifest mesh, and then render the design as a 3-D object.

After fiddling around with the ankh, a white light and a blue light, and various planes, I came up with some designs that look like they should be on the cover of a 1980's ambient synthesizer band's album.

The images I liked the most had a white light behind the ankh to back-light it and a blue light just above the ankh in order to cast blue anti-shadows onto the plane behind.  I got different shadow effects by moving the backdrop farther or closer to the ankh.

I like the first image because the blue light behind makes the ankh look like it is descending from space, or like there's some mystic teleportation going on.


For the second image, I moved the blue light so it was in the junction of the vertical and horizontal openings in the ankh.  I like this one because the light is implying a second ankh behind or somehow extending out of the solid one.  It does look a little like a sword hilt, though.


The third image has some hour-glass suggestions going on in the background.   It's a little distracting, and makes the ankh look a little like a tattoo on some woman's mid-drift.  I placed the blue light at the base of the ankh, so there's a saturation of blue there.  There's also the teleportation ray going on, too.  I think I might crop this so that it's square.


The fourth is one of my favorites because it looks like the ankh is being put into a box made out of the sky.


Tuesday, June 02, 2015

Pretending to be a Graphic Designer

When I'm not writing or critiquing or trying to learn new programming languages or playing the harp or trying to be a better person, I make little cards using Blender.

Here's one I made for Mother's Day.  I based the design off of some water lilies carved on the side of an Egyptian temple.  The objects are the same color, and I tinted them with different colored lights.


 I made this card for my brother-in-law, who's an engineer.  I figured he'd like the platonic shapes and the simple lighting.  I wanted this one to look a little like some 1920 German lithograph.  There were only two lights, a white and a blue one.   I arranged the solids to be paired with their doubles (the icosahedron and the dodecahedron, the cube and the octehedron, and the tetrahedron with itself).

This was going to be a background for 2014's Christmas card, and we were going to be riding the notes like they were Segues.  I wanted it to look like a Brazilian bar Donald Duck Jose Carioca and the Arucan Bird dance in, but Mark said it was "too gay" and nobody really got their poses right, so we scrapped it for a more traditional card.

This time around I colored the objects so I wouldn't have a melange of colored shadows in the background.  Below (I think) the view of the camera, I used green and white lights against a few triangle shapes to imply a forest background.  Making the treble clef was particularly difficult because I imported it from InkScape, and converting it from curves to a mesh object introduced some holes in the object I had to manually go through and close up -- otherwise it would have had some funny looking holes in it where there was no outside facing the camera.

Saturday, February 14, 2015

Sunday, August 31, 2014

Virtual Stars and Labyrinths

One of the rewards I give myself is working with Blender to create 3D images.  Lately, I've managed to use InkScape to create 2D patterns which I then import into Blender extrude into 3D shapes.  

Importing from InkScape works fairly well with angular objects, but curved objects tend to generate objects with a broken manifold or with a missing facet that shows the insides of solid objects.   When an object isn't manifold, I have to go in and edit objects on a vertex and face levels.

Blender can use Boolean Logic to create complex shapes by combining or subtracting simple objects.  My favorite function is the difference function, followed by intersection function.  

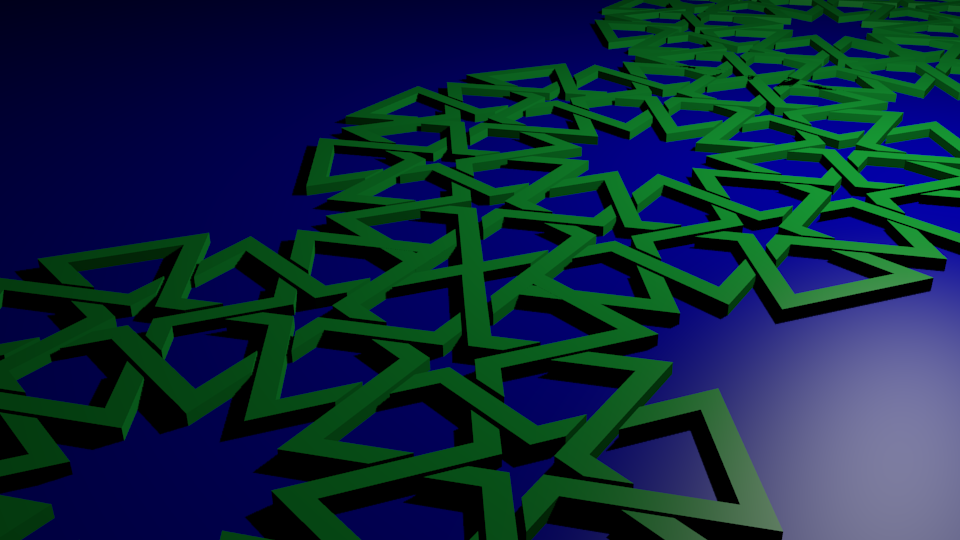
One of the latest designs I've worked on are a Moroccan tile design created by interweaving five pointed stars.  Since the symmetry is pentagonal, the golden mean shows up frequently. Interweave designs require careful focus during the InkScape design process to get the over-under pattern correct.  

The other design is a labyrinth.  After looking at ancient and classical labyrinth mosaics, I worked on something similar.  After following some false trails (heh), I found that creating a roughed-out design on paper was more efficient than trying to make paths work in InkScape. 

I managed to create a labyrinth and get it into Blender.  Then I extruded it into something a person could walk through.  Or possibly a stove element.  

Revisiting the labyrinth, I managed -- with a whole lot of difficulty -- to grab just the top vertices of the extruded labyrinth, then scale them down so that instead of a disk shape, I had a cone shape.  From there, playing with a sphere gave me... Tron's lightcycle helmet, I think.

Oh well.  I'm hoping that I can create some interesting objects by sending the Blender Items to Shapeways, a 3D printing company.


Saturday, August 16, 2014

Three-D Printed Sake Mug!

It's here! It's here!

About six weeks ago, I designed a mug using Blender.  Well, okay -- the end result is a sake cup.  Anyway, I wanted to make something for my and Mark's tenth anniversary.

First I used Inkscape to make a shape that I could virtually spin into a mug.  I knew from past experience that when I tried to make objects in Blender with medium-complex topology that I got a lot of weird edges and orphan vertices and mesh faces.  Also, it's sometimes hard to know how thick everything is in Blender and easier to start out with a known proportion in Inkscape.

Once I had a shape I thought I could work with, I went into Blender.

I used Blender's spin function as a kind of lathe to make a mug and then I used some Boolean Nots to cut oval wholes in the side.  (I'm cutting out the parts where I goofed up and made things that didn't work.)

Then I went to the Shapeways web site and uploaded the build... and I discovered that ceramic materials are, um, kind of expensive (but not as expensive as bronze, steel or gold).  Ceramics are the only food-grade material they offer.

Then I waited.  And waited. And waited.


 When Shapeways told me the build was ready, I tracked the shipment.


When I got the package, it felt kind of light.


But I was excited!  There was a lot of packaging.  I was glad that the ceramic mug was so well protected.


There were about three layers of bubble wrap.  Getting smaller; the reality of how big six centemeters is began to sink in.  


And TADA!  The finished product in white.  This one's for Mark.  I'm getting a black one, which --although identical -- was harder to print and has been delayed.


I'm psyched that this came out so robustly, and yeah, it holds a tablespoon of liquid.  I'd envisioned sipping hot cocoa or maybe sake (if I drank sake) from it, but I'm pretty sure we're the proud owners of a very artistic medicine cup.

Monday, July 14, 2014

Friday, July 11, 2014

Zellij and Blender

Sometimes it's nice to take a break from reading and writing and play with virtual objects in 3D space.

I've wanted to create an interwoven pattern from this design for some time.  I thought I was going to have an unmanifold object when I imported part of this design from Inkscape into Blender.  When I rendered the design, some of the top faces were shadowy, as if there were missing sub-faces.  I tried to fix some of the stray faces and vertices in the model, but gave up.  Serendipitously, when I stretched my model out and then performed a Boolean difference with a flattened cube, the "jagged" edges of the model were smoothed out.

Friday, May 16, 2014

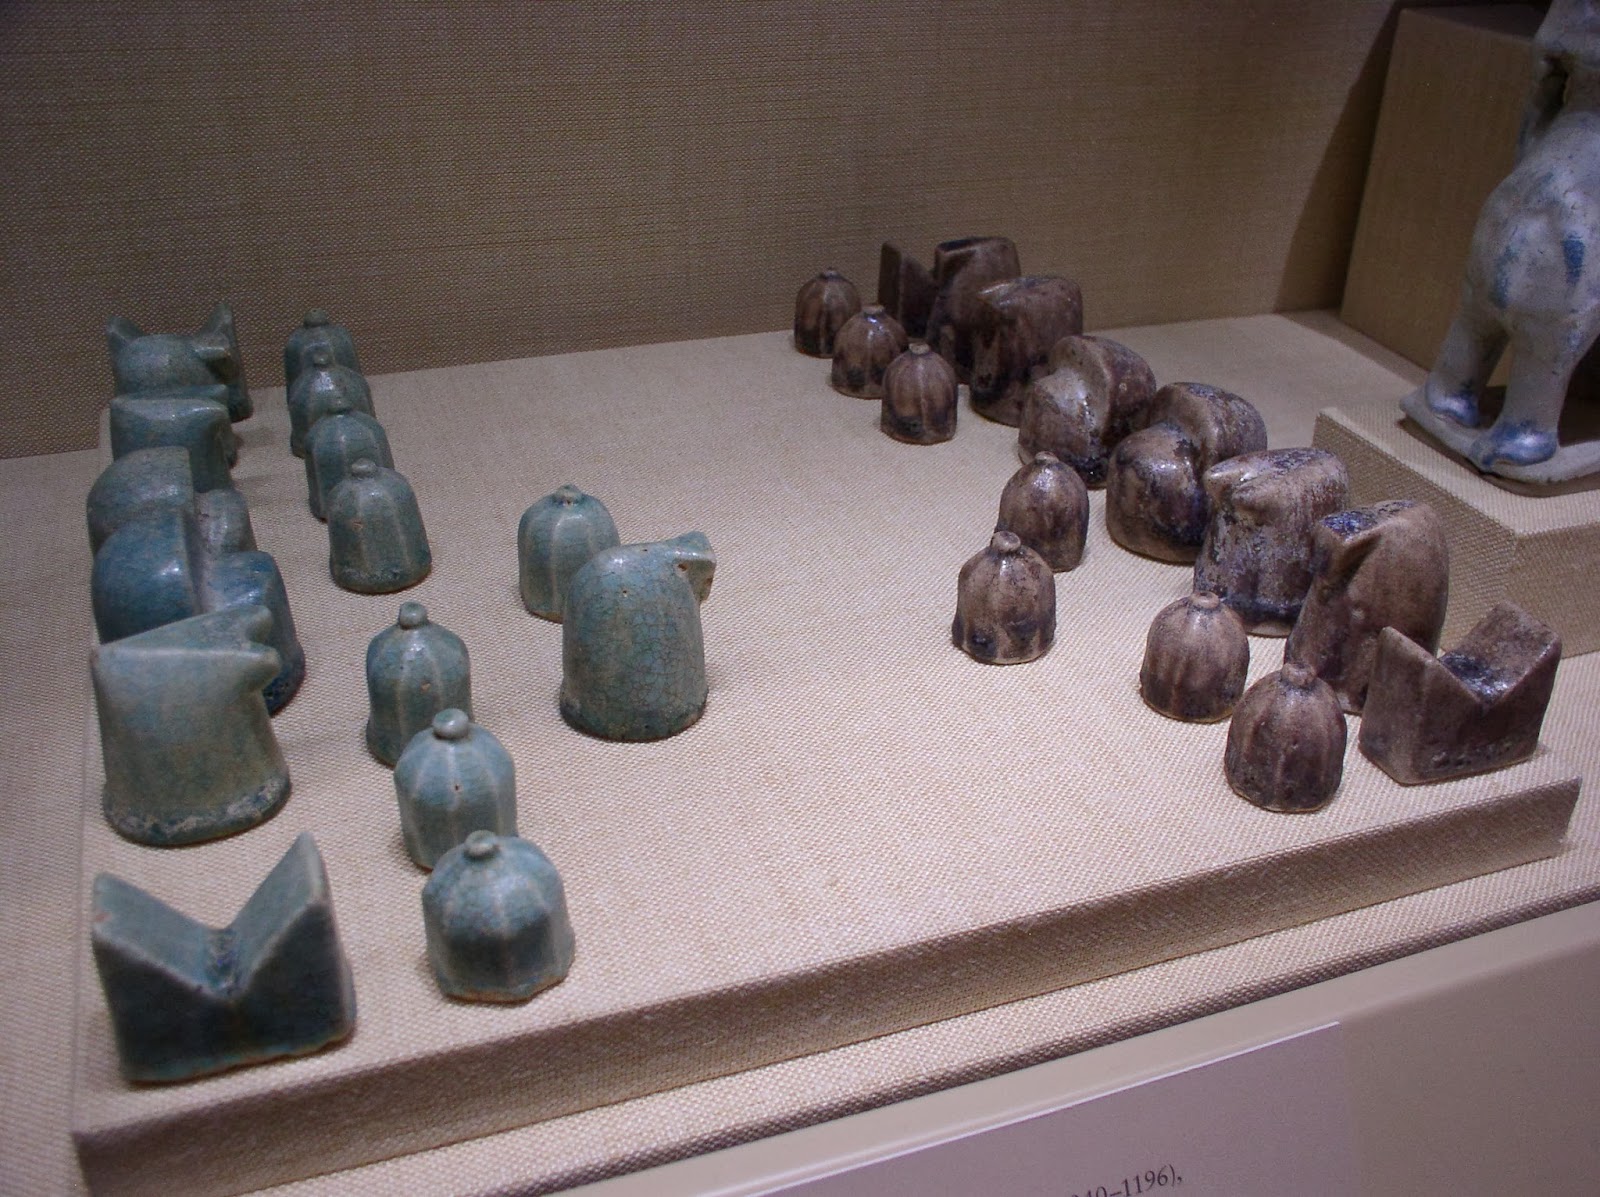
MET: Iranian Chess Set

 I'm always interested in making my own chess set, so when I came across this set at the MET, I had to take its picture.
The rooks at the end are supposed to be chariots.  And the piece advancing on the left-hand side is a knight (the triangular thing is supposed to be the horse's nose).


The set is from around 1075 AD, and is "one of the earliest extant examples in the world."
What's funny is how this Bauhaus chess set (which I rendered in Blender a year or so back, based on a Bauhaus set I'd seen) looks similar.

It could be kind of fun to make a set with square and spherical sides.

Saturday, April 26, 2014

More Zellij

Hey! Look... John's messing around with zellij.  Again.  He wants to make a tile in Blender then send it to Shapeways.  No.  Really.


Wednesday, January 22, 2014

Circles of Interwoven Stars

Here's a Blender rendering I did a while back.  I keep coming across it, and yesterday I found a physical photograph of it which I put on my office door at work.

I hadn't realized it at the time, but it is the same geometry as the zellij tiles I've studied more recently.  I like the patterns that have regular five-pointed stars in them.  These are difficult to have come out right, because 72 degrees really only works well with other pentagon-based shapes, and then the golden mean rears its ugly head and everything starts to look like Penrose Tiles.

Which isn't a bad thing, actually...

Sunday, September 29, 2013

Eye of Horus Render

Ah, Blender. I've missed you.  Here, have an Eye of Horus SVG file to render.

Wow.  That worked whole lot more effectively than wiggling little bits of cut-out paper in front of a camera late at night.

And Mark has is getting into his Holiday Beading thing -- now that I've got the Eye in a Blender file, I can convert it to something MakerBot could print (I'll need to add little eyelets for him to string string through...)

Sigh.  It looks like I'm reverting back to my late-night-computer sessions.  Time to get back to going to bed by 9:30 (uh oh) so I can get up early in the morning to write.

Oh!  Hey!  I could add a gear to this Eye and....

Sunday, October 28, 2012

More Renderings


I haven't been writing much in this blog, mostly because I've been really busy.

Here's a cylinder of interlocked circles I created in Blender.  I had a sudden insight about how to do it this.  I'd been thinking about carving pumpkins.  Jenn Wild had forwarded me a photo of an insanely carved pumpkin that was a carousel with horses.  I'd been thinking about zillij and how I might use a star-shaped cookie cutter to make a vague kind of Moroccan lamp.  The images must have been bumping around in my head because I figured out that I could use a Boolean intersection to make the individual rings, then use Blender's spin function to make a ring of interlocked circles, then use the array function to stack them.

The whole operation took about 45 minutes.  If I'd tried this a year ago, the rings would have been flat, and I would have spent several days trying to stack everything just so.


Saturday, March 10, 2012

Printing the Scarab

When I'm not writing, I play with Blender. Blender is a 3-D rendering program, sort of like AutoCad. It has a programming language, Python, that it can use to make mathematically precise models (and, goodness knows, you have to be precise when you're making 3D virtual star tiaras).

Over the winter, I've focused on geometric designs, but the latest project has been a scarab.


It turns out that Blender objects are pretty easy to export to files that MakerBot can use. So when Mark Wild said that he was going to visit the Eugene Maker Space and play with their 3D printer, I tagged along.


The setup took a little longer than we expected. But once everything started up, we were able to load a STL file of the scarab onto the MakerBot's rendering engine. Our first big surprise was how small the scarab was; we had to increase its size by four times.

Our next snag was discovering that the MakerBot G-code build (the set of instructions that actually make the MakerBot printer extrude plastic) wanted to save to my RAMstick, which I'd write-protected.  Once we figured that out, the software took about five minutes to figure out the best path for the plastic printer head to take to create the scarab.   And then another ten minutes to print it out.


The end result didn't come out as solidly as I thought it would, although it is recognizable as a scarab.


What I learned:


  • The scarab design was too detailed and small. The parts that came out the best were the circular solar disk element and the dung beetle's carapace. What seemed like huge chunky bits to me when I was creating the scarab model turned out to be itty-bitty when printed. We probably would have had a cleaner print job if we'd expanded the model one more time.
  • I should have put down a base to build upon. To make the wings' feathers stick out, I put all of them on the zero Z plane and then varied their thickness so the leading feathers were thicker than the trailing feathers. The feathers probably confused the MakerBot G-code because there were about fifteen, they overlapped, and by design they weren't all able to touch the printer's bed.
  • I think next time rather than build a complex objects out of multiple overlapping ones, I'll see how much leverage I can get with a simpler design and one object with multiple Boolean difference "cuts" out of it. I also suspect that the procedure I followed to clean up the model didn't catch interior planes and vertices, which resulted in some, um, non-intuitive printer head paths. Or...um... use Boolean difference on the overlapping feathers.
  • The MakerBot print head will approximate its print path in an attempt to fill an odd shape with plastic. It's not so much a limit on the printer head so much as it's a limitation of the melted plastic coming out of it. Which means you may or may not get the coverage you thought you might. An analogy would be trying to use a tube of toothpaste mounted on an etch-e-sketch to sign a check.


But, even though it looked a little like something Spiderman might make out of his webbing, I love it and have something to put on my forehead when I say, "Almighty Isis (Isis-Isis-Isis)!"


Saturday, January 08, 2011

Star Tiara

After a hard day editing multiple manuscripts and installing Scrivener on several machines, there's nothing like kicking back at the end of a day and designing a star tiara.  Even if I do have to do the geometry by hand once I have the stars.

Friday, December 31, 2010

Star Cube Tiaras!

I've been playing with Blender 2.55 (beta) and making some virtual objects. It's fun, and since playing with a paper and a compass is my idea of relaxing, it's mostly relaxing, too.


I wanted to make a tiara of stars. So I fiddled around and managed to create a Python program that would calculate the angles and make stars with as many points as I wanted. Blender draws virtual objects by collecting a set of points together and then associating them into sets of object faces; the whole collection of points and faces is called a mesh. I even got to use the golden ratio, phi, to make the star's arm's lengths come out the right length to make a perfect-looking five point star.

Then I discovered that the Python function that rotates meshes, bpy.ops.transform.rotate, is on the bug list. Meaning that it doesn't work. Meaning that I can't be lazy and use a program to place perfect five-point stars in an arc around the crown of a tiara.


Bother.


After a short sulk, I decided that the functions that create cubes, spheres, and other objects still work -- and they have built-in bits for rotation and placement. So. Here we go: Tiaras. Some day the bpy.ops.transform.rotate function will be fixed....

Friday, December 17, 2010

Mathematical Sculptures

Here's more sculptures.


I've lit each sculpture with three lights, a white one above, a green light from the left, and a blue one from the right. This creates some interesting blue and green anti-shadows.


I used to make these sorts of designs on an old HP graphic computer (with thermal paper) back in 1983.


Of course, the "computer" was more like a programmable calculator. And it didn't have a 3-D graphing function (that I was aware of).


After I had made a few of these things, I realized that some of my color-blind friends are not going to see them so well. Sorry.


Originally, I had red and blue lights, but they made the shadows "pop" in a way that was confusing.


All of these were built by a Python script. The script builds a list of points in three dimensions (vertices), then passes them to Blender. Then the Python script tells Blender which vertices are connected into faces. This should be a solid virtual object.


I sent one to Spaceways to see if it would print, but it wouldn't. I believe I didn't tell Blender to make the models small enough for Spaceways' "printer," and so it got auto-rejected.


I might go back to simply building compound models from simple geometric shapes, rather than using a single complex object.