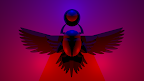
Over the winter, I've focused on geometric designs, but the latest project has been a scarab.
It turns out that Blender objects are pretty easy to export to files that MakerBot can use. So when Mark Wild said that he was going to visit the Eugene Maker Space and play with their 3D printer, I tagged along.
The setup took a little longer than we expected. But once everything started up, we were able to load a STL file of the scarab onto the MakerBot's rendering engine. Our first big surprise was how small the scarab was; we had to increase its size by four times.
Our next snag was discovering that the MakerBot G-code build (the set of instructions that actually make the MakerBot printer extrude plastic) wanted to save to my RAMstick, which I'd write-protected. Once we figured that out, the software took about five minutes to figure out the best path for the plastic printer head to take to create the scarab. And then another ten minutes to print it out.
The end result didn't come out as solidly as I thought it would, although it is recognizable as a scarab.
What I learned:
- The scarab design was too detailed and small. The parts that came out the best were the circular solar disk element and the dung beetle's carapace. What seemed like huge chunky bits to me when I was creating the scarab model turned out to be itty-bitty when printed. We probably would have had a cleaner print job if we'd expanded the model one more time.
- I should have put down a base to build upon. To make the wings' feathers stick out, I put all of them on the zero Z plane and then varied their thickness so the leading feathers were thicker than the trailing feathers. The feathers probably confused the MakerBot G-code because there were about fifteen, they overlapped, and by design they weren't all able to touch the printer's bed.
- I think next time rather than build a complex objects out of multiple overlapping ones, I'll see how much leverage I can get with a simpler design and one object with multiple Boolean difference "cuts" out of it. I also suspect that the procedure I followed to clean up the model didn't catch interior planes and vertices, which resulted in some, um, non-intuitive printer head paths. Or...um... use Boolean difference on the overlapping feathers.
- The MakerBot print head will approximate its print path in an attempt to fill an odd shape with plastic. It's not so much a limit on the printer head so much as it's a limitation of the melted plastic coming out of it. Which means you may or may not get the coverage you thought you might. An analogy would be trying to use a tube of toothpaste mounted on an etch-e-sketch to sign a check.
But, even though it looked a little like something Spiderman might make out of his webbing, I love it and have something to put on my forehead when I say, "Almighty Isis (Isis-Isis-Isis)!"

No comments:
Post a Comment